Cap comes with a bunch of automated recipes, to check I haven’t broken anything, I run through some predefined tests to create some ROMs, if you have the ROMs and modules that are used for these tests then you can run them and this will check that Cap is (still) working.
I created these tests for my own use, as occasionally I break things when I update code, and I wanted a bunch of tests to verify that it still works as expected, but you may find some of the ROMs it creates and edits useful too, and of course, you can read the files and see what they do and how they do it, some of the tests will probably seem pointless, but I’m testing the feature, not just trying to create something useful, if you want me to add a test for the ROM you want to create, I can do that too!
The logs for the tests are saved under “Tests” and the outputs are under “Outputs”, the code checks that the files have been created correctly with matching CRC32’s, as always, no ROMs are included here, if a test fails, that might be because you don’t have the ROMs/modules needed, so don’t panic!
By the way, a test will generally use the hashes of the ROMs and Components rather than than the filenames because I won’t know where yours are stored or what they are called (they must be under ROMs/Components), so I do an “auditfiles ROMs” first to scan all available ROMs or “auditfiles Components” to find specific components, I can then find it by it’s hash value in the form “$0x00000000”.
Running them
There’s three/four different rats, two/three CLI based ones and a Windows GUI, before you run the tests, copy your ROMs to ROMs, ADFs to ADFs and Components to Components, remember, no ROMs are included here, so all the tests will fail if you don’t do this first.
- For Linux and MacOS in your shell just cd into the Capitoline directory and run ./rat.bash
- For Windows, open a command prompt, cd into the Capitoline directory and run rat.bat
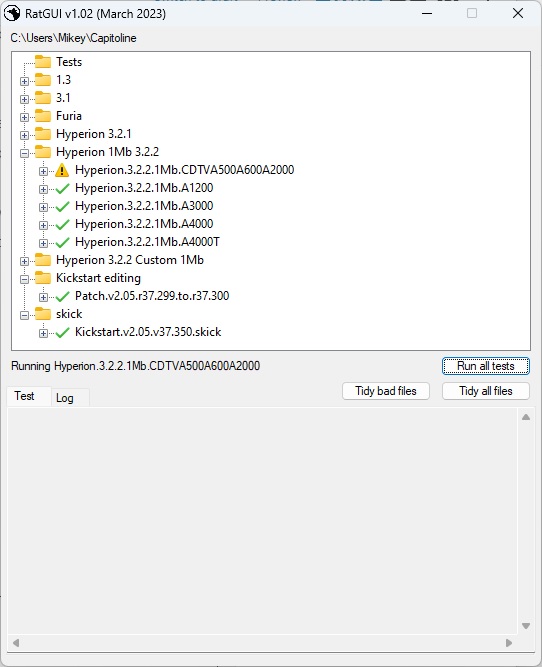
rat.bat doesn’t pause so you may miss the summary if you double click from explorer (maybe I’ll add a pause) - For the Windows GUI, double click on RatGUI.exe
Rat will create your ROMs and other output under Capitoline/Tests/Output, a red X means it failed, a yellow triangle means it’s running and a green tick means it’s OK, they are grouped up, so a red cross means at least one failed, this should only be because you don’t have a required component or ROM.
The GUI isn’t very responsive when it runs, so just let it finish the tests before poking with it.
Here’s an example of the Rat command line output
mikey@DL380:/Mikey/Capitoline$ ./rat.bash
====================================
        Recipes and Tests
           Linux/MacOS
------------------------------------

====================================
A1200.Classic.1Mb
------------------------------------
Deleting any previous output...
Running test...
Checking output files...
A1200.Classic.1Mb.F8...OK
A1200.Classic.1Mb.E0...OK
Test OK
====================================
Hyperion.3.2.1.1Mb.A1200
------------------------------------
Deleting any previous output...
Running test...
Checking output files...
Hyperion.3.2.1.1Mb.A1200.F8...OK
Hyperion.3.2.1.1Mb.A1200.E0...OK
Hyperion.3.2.1.1Mb.A1200.hi.bin...OK
Hyperion.3.2.1.1Mb.A1200.lo.bin...OK
Test OK
====================================
Hyperion.3.2.1.1Mb.A600
------------------------------------
Deleting any previous output...
Running test...
Checking output files...
Hyperion.3.2.1.1Mb.A600.F8...OK
Hyperion.3.2.1.1Mb.A600.E0...OK
Hyperion.3.2.1.1Mb.A600.0.bin...OK
Hyperion.3.2.1.1Mb.A600.1.bin...OK
Hyperion.3.2.1.1Mb.A600.bs.bin...OK
Test OK
====================================
Hyperion.3.2.1.with.TerribleFire
------------------------------------
Deleting any previous output...
Running test...
Checking output files...
Hyperion.3.2.1.withehide...OK
Hyperion.3.2.1.withehide.hi.bin...OK
Hyperion.3.2.1.withehide.lo.bin...OK
Test OK
====================================
Furia.3.1.8Mb.PCMCIA
------------------------------------
Deleting any previous output...
Running test...
Checking output files...
Furia.8Mb.PCMCIA...OK
Test OK
====================================
Bootable.1.3
------------------------------------
Deleting any previous output...
Running test...
Checking output files...
Bootable.1.3.bin...OK
Test OK
====================================
Kickstart.v2.05.v37.350.skick
------------------------------------
Deleting any previous output...
Running test...
Checking output files...
kick37350.A600.RTB...OK
Test OK
====================================
Patch.v2.05.r37.299.to.r37.300
------------------------------------
Deleting any previous output...
Running test...
Checking output files...
Kickstart v2.05 r37.300 (1991-11)(Commodore)(A600HD)[!].rom...OK
Test OK
====================================
Summary
------------------------------------
19 files of 19 OK
8 tests of 8 OK
1Mb Classic ROMs
A1200.Classic.1Mb
This test creates a “classic” (v3.1) ROM for the A1200, I put a couple of modules in the extended ROM, in this case the compactflash.device and fat95 driver, you’ll need to copy the files (compactflash.device and fat95) out of the archive and put them under “Components”, you can use 7Zip or other tool for this if you don’t have lha available.
# Needs the A1200 v3.1 (r40.68) ROM, compactflash.device and fat95 driver

0xbddca450 Tests/Output/A1200.Classic.1Mb.F8
0x9dded63f Tests/Output/A1200.Classic.1Mb.E0
1Mb Hyperion ROMs, with Workbench and Icon libraries
Hyperion.1Mb.A600
This test creates a Hyperion 3.2.1 ROM with workbench.library and icon.library for the A600, two separate ROMs and two byteswapped files suitable for burning to an EPROM (ending 0.bin and 1.bin, assuming you’re using a TL866 and it can only burn 512k at a time, different burners could perhaps do the complete 1Mb at a time, the file just ending bs.bin, or if you don’t want it bytesswapped, just ending .bin).
There’s plenty of space in the E0 ROM, so you could add the PCMCIA/fat95 drivers or anything else you fancy.
# Needs the Hyperion 3.2.1 ROM and the A600 Modules ADF

0xc01253dd Tests/Output/Hyperion.1Mb.A600.F8
0xbfeb091e Tests/Output/Hyperion.1Mb.A600.E0

0x84c7724f Tests/Output/Hyperion.1Mb.A600.0.bin
0x1a7e29d1 Tests/Output/Hyperion.1Mb.A600.1.bin
0x533cfa87 Tests/Output/Hyperion.1Mb.A600.bs.bin
0x71c37da6 Tests/Output/Hyperion.1Mb.A600.bin
Hyperion.1Mb.A1200
As above, his test creates a Hyperion 3.2.1 ROM with workbench.library and icon.library for the A1200, two separate ROMs and two byteswapped files suitable for burning to EPROMS
# Needs the Hyperion 3.2.1 ROM and the A1200 Modules ADF

0x5bfc4955 Tests/Output/Hyperion.1Mb.A1200.F8
0xbfeb091e Tests/Output/Hyperion.1Mb.A1200.E0

0xbbaf4a4e Tests/Output/Hyperion.1Mb.A1200.lo.bin
0x67bcddce Tests/Output/Hyperion.1Mb.A1200.hi.bin
Inserting modules into spare ROM space
Hyperion.3.2.1.with.TerribleFire
This test creates a 512k Hyperion 3.2.1 ROM for the A1200 but includes the ehide module, it also creates two byteswapped files suitable for burning to a pair of EPROMs.
# Needs the Hyperion 3.2.1 ROM and the ehide library

0x2b653371 Tests/Output/Hyperion.3.2.1.withehide

0x1efb5126 Tests/Output/Hyperion.3.2.1.withehide.lo.bin
0xbd91b16d Tests/Output/Hyperion.3.2.1.withehide.hi.bin
Replacing individual modules in a ROM
Furia.8Mb.PCMCIA
This test creates a 512k v3.1/r40.63 for the A600, replacing the original cardres.device with a patched one which doesn’t disable the PCMCIA slot when you have an 8Mb RAM card, specifically, this was for the Furia with an onboard 8Mb memory but it might work for other machine/card combinations.
# Needs the A600 3.1 ROM (r40.63) and the patched cardres.device

0x61b54b0c Tests/Output/Furia.8Mb.PCMCIA
Completely custom ROM
Bootable.1.3
This test creates a 512k ROM based on the A500 v1.3 ROM but adds in a scsi.device from the A600 v3.1 ROM, this is actually way more complex than this because it needs to create a bootlist (so it’s bootable) and initialise a real (or fake) Gayle, so there’s quite a lot of patching involved, it’s useful for 68kide based RAM cards.
# Needs the A500 v1.3 ROM (not the A3000 one) and the A600 3.1 ROM (r40.63)

0x642e7e05 Tests/Output/Bootable.1.3.bin
skick
Kickstart.v2.05.v37.350.skick
This test creates an skick (RTB) file from the v2.05 r37.350 ROM designed for the A600, to test this you need to put this file in the Kickstarts folder and also a copy of the A600 ROM (note, this must be named kick37350.A600) then just call “skick Kickstarts/kick37350.A600” and your Amiga should soft kick up as r37.350.
# Needs the A600 v2.05 ROM v37.350 for the A600

0x3800b380 Tests/Output/kick37350.A600.RTB
Simple patching
Kickstart v2.05 r37.300 (1991-11)(Commodore)(A600HD)[!].rom
This test recreates the v37.300 ROM exactly from the v37.299 ROM.
The r37.299 ROM was actually created after the r37.300 ROM, and only varies by six bytes, the version number (300->299), the LIBHEADER for the scsi.device driver (0x4AFC->0x0000), and the checksum (0xDB27680D->0x2623680F) yes, all the device code is in the ROM, just disabled from loading automatically. I suspect this was a cynical marketing ploy to upsell/distinguish the A600 from the A600HD, or perhaps, more generously, disabling the scsi.device allows a slightly faster boot when you don’t have a hard drive, although, if you want a faster boot, you’d want to skip the entire scsi.device code.
# Needs the A600 v2.05 ROM v37.299 for the A600

0x64466c2a Tests/Output/Kickstart v2.05 r37.300 (1991-11)(Commodore)(A600HD)[!].rom
Creating your own
To create your own tests you need to do three things, pick a name for your test, in this case “mytest”, you must use this name consistently when you create your files.
Be warned, remember to save your files somewhere safe if you update Cap as your files might be overwritten!
# File(s) and locations
Tests/ (folder where all the tests are)
Tests/Tests.txt (a list of all the tests to run)
Tests/mytest.test (the specific test script)
Tests/mytest.expected (the files that your script is expected to create)
Tests/Logs/mytest.log (the log that the system will create)
#1 Create the *.test file
Under the Tests directory/folder just create a file with a unique name, e.g. “mytest.test”, this will be a script, exactly the same as the others, it’s very, very important that you have an “exit” line in the script or it may just hang when you run it, waiting for an exit.
#2 Create the *.expected file
Under the Tests directory/folder just create a file with a unique name, e.g. “mytest.expected”, this will be a list of files that your script will create, the file is split into two fields, the CRC32 of the expected file and the path to the file, if you don’t know the CRC32 then it will appear that the test will fail as it uses this to validate that the test worked.
The expected file MUST be named in a similar way to the *.test (the first bit “mytest” must match, this is the name of the test)
0x789a123b Tests/Output/mytestrom.rom#3 Add the test to the list of tests
Edit the file Tests/Tests.txt, if you add a heading (with a leading #) then this will be the heading in Rat, in this case “My Custom Tests”, then list your test, in this case “mytest” (note, no .test – just the name without .test on the end)
#My Custom Tests
mytest